Using LibreCAD Blocks
Blocks are a very useful aspect of all CAD drawings. A block is most simply described as a drawing inside of another drawing. This allows you to reuse complicated or frequently used components in multiple drawings or multiple times in the same drawing.
When you insert a block into a drawing, you can move it as a single item, edit it, and delete it easily without it disturbing other parts of your drawing. Anything can be turned into a block, but a frequent use is in floor plans, where toilets, sinks, ovens, and other common household items are blocks to be inserted in place.
Creating a Block
Without even knowing it, you have created blocks before. Any saved drawing can be used as a block. A block is simply an existing drawing inserted into a new drawing. The inserted drawing will act as a single object instead of being exploded into it’s line segments.
To create a block, draw a component you want used in future drawings. It’s not uncommon to create blocks while working on a larger drawing to improve organization and have those components for the future.
Once your drawing is complete, save the drawing as a DXF or DWG. You don’t need to place the drawing anywhere specific, but organizing your blocks into folders makes it easier to find them in the future, and you can even set LibreCAD to show those folders in the “Library Browser”.
Inserting a Block
There are three different ways to insert a block into a LibreCAD drawing. The easiest and most straight forward method is to import the block. The second method is to use the Library Browser, which is very similar, but you need to first setup the location of your library. The third method is to insert an existing block, which gives you the option to edit a single block and have the changes be applied to all similar blocks in the same document.
Inserting Block from File
- Go to “File” > “Import” > “Block”.
- Navigate to the drawing you want to import.
- Using the cursor you can place the drawing, or enter the coordinance in the command line.
Inserting Block from Library Browser
- Go to “Options” > “Application Preferences”.
- Switch to the “Paths” tab.
- Set the path of “Parts Libraries” to the directory where you store your saved blocks.
- Inside the “Library Browser”, navigate to the block you want to insert and select it.
- Click on the “Insert” button below the “Library Browser”.
- Using the cursor or the command line, set the coordinance where you want the block placed.
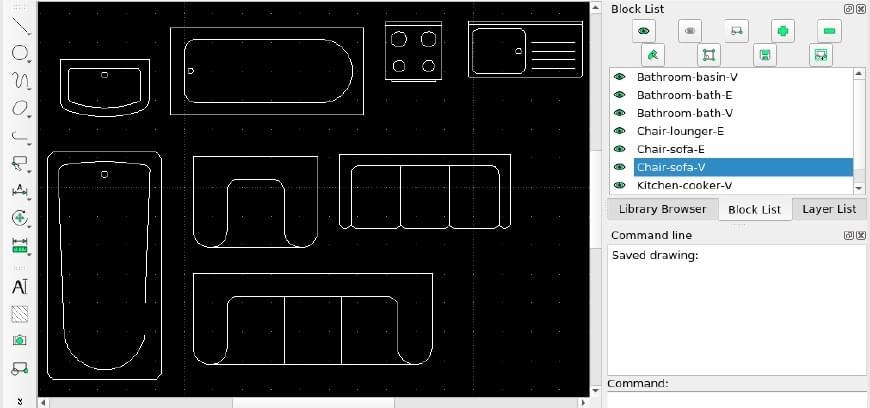
Once the block is inserted, it should appear in the drawing and as a new block inside the “Block List” panel.
Inserting an Existing Block
Once you insert a block using one of the above two methods, you can then reinsert the same block. This gives you the unique ability to edit the block and have your changes be applied to all duplicate blocks of that type.
- Navigate to the “Block List” panel.
- Right click on the block you want to insert again.
- Select the option “Insert Block” from the context menu.
- Using the command line or your cursor, place the block into the drawing.
Deleting Blocks
Deleting blocks couldn’t be easier. There are two ways to delete a block though, depending on if you want to reuse the block in the drawing at a later time.
You can simply delete the block from inside the drawing as you would with any line, circle, rectangle, or other shape. This still keeps the block in the “Block List” so you can insert it at a later time.
The other method is to use the “Block List” to remove the block, which will remove the blocks of that type from the drawing. Navigate to the “Block List”, right click on the block you no longer want, and click on “Remove block”. All blocks of that type will be removed from the drawing.
Editing Blocks
Editing blocks gives you the benefit of making altercations to a block without having to alter the original drawing, plus if you have the same block inserted multiple times, lets you make a change once but have it applied throughout the drawing.
- Using the “Block List”, select the block you want to edit.
- Right click on the selected block, and click on “Edit Block”.
- At this point, a new drawing will open of the block. This block isn’t a saved file, so alterations to this won’t affect the original file you imported.
- Make adjustments to this file. You do not need to save the block, changes are made instantly. If you make changes you don’t want to keep, be sure to undo them instead of closing the file.
To go back to your original drawing, you may have to select the menu item “Drawings”, and switch back to your original drawing. Or you can close out of the block drawing.
Why Blocks Rock
Blocks make working with large projects more organized and lets you easily reuse parts of your drawings multiple times. For instance, if you’re drawing a floor plan, you can reuse a toilet or a shower in multiple parts of the drawing without having to redraw or copy and paste the lines.
Another benefit is you can make a single change to a block and have it applied to all blocks of that type in a drawing. This is honestly the part I enjoy the most since you save a bunch of time by fixing it once instead of having to fix the same part everywhere it exists.