Remove Samsung SF350 Monitor Stand Hinge
Samsung’s SF350 monitor has one major design flaw for users who wish to mount their monitor to the wall or to a monitor arm using the VESA mount. The stand hinge that is attached to the back of the monitor where the default stand attaches to doesn’t have a way to be removed.
The stand hinge interferes with the VESA mount making it so you can’t tilt the monitor properly when you are using a VESA mount to a wall or a monitor arm. But there is a method to remove the hinge, but it does require some steps many users are probably not comfortable with doing.

Remove Stand Hinge from SF350
Follow the steps below to remove the hinge from the Samsung monitor. Remember to be careful when disassembling the monitor casing to not damage the case, screen, or circuitry inside. There is circuitry where the power button is located and at the top of the monitor for the backlight.
- Disconnect the monitor from all cables, remove the stand base and stand stem from the monitor if it’s still attached, and remove your VESA mount hardware from the back of the monitor.
- Lay the monitor on a soft flat surface, such as a blanket on a large table.
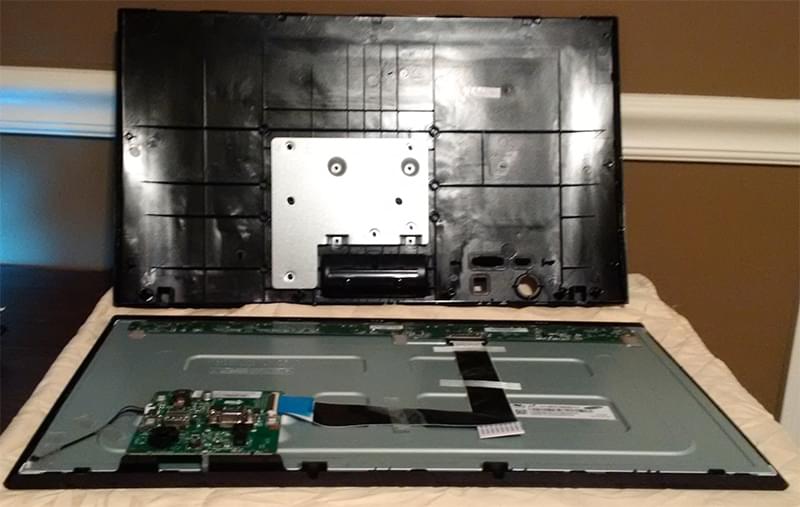
- On the bottom of the monitor there are two small inserts about 1" from either side of the monitor. Insert a spudger and slowly pry the back panel off of the monitor. Slowly work your way around the bottom, left, and right of the monitor until the back panel is removed. The top portion of the monitor contains circuitry, and isn’t necessary to pry apart from the monitor to remove the back panel. Remember that there is a screen directly below where you are prying with little protection. Be careful to only separate the plastic pieces without damaging the screen.
- Once the back panel comes off, there are two Phillips-head screws that hold the stand hinge in place. Remove these screws and save the hardware if you believe you’ll ever want to use the monitor stand in the future.
- Insert the back panel back onto the monitor. I started with the top section of the back panel and worked my way around snapping the back panel back into the monitor.
If you don’t have a spudger to use, you can use a slotted / flat head screwdriver although it will probably cause some damage to the plastic case of your monitor. You can also use any thick piece of plastic like a guitar pick. But your best option is to purchase a spudger kit for really cheap.
This tutorial applies to the SF350 series of monitors including the LS19F350 and LS22F350. The tutorial might also work with the SF351 monitors that have a similar hinge.