Splice Audio File into Multiple Clips Audacity
If you’re interested in creating songs or remixing existing ones, you need a way to sample existing songs. Sampling, or also called splicing, is the method of grabbing segments from audio to be used in mixes and more. With these audio clips, you set them to specific pads on your MIDI hardware. Now there is professional software out there that can do this, but I prefer a free method using software I already have installed unless I really need the advanced features.
Using Audacity, you can simply turn one song into many segments and clips and have them export all at once. Or, if you have a LP recorded you can split it into the proper segments. You will need to download Audacity, which is free and very fast to install. Other than splicing music, Audacity can do much more, such as recording audio and performing some basic effects to existing audio.
Importing Audio to Audacity
To begin, you need to open your audio file in Audacity. Some songs will be protected and audacity won’t allow you to edit them and sometimes won’t allow you to open them. You will need files that you properly own without protection. Also, when re-using other people’s work, you need to have their permission unless this is used only for personal use (not releasing it or using it anywhere).
Drag your audio file right into Audacity (anywhere). You should see a
new audio track appear. You can play it by pressing the Play Arrow, or
by pressing space on your keyboard.
Creating a Label / Splice
Move your cursor and click to a part of the song you want to have a
segment of. You can zoom in using ctrl + mouse wheel. Once your
marker is in the correct location (a line appears where the marker is),
you can add a new label.
Under the top navigation menus, you will want to find Tracks - Add
Label at Selection. This will add a bar under the track named “Label
Track” where you can modify existing labels. Grabbing the circle
segments of the track selector, you can move the whole segment to a new
location. Using the arrow like shapes attached to the circles, you can
adjust the length of the area the label / splice takes place.
At any time, you can make adjustments to a Label and rename them. You can also have labels overlapping just in case you need part of the audio in both labels or samples.

Testing the Label
To test a label to make sure it’s the right section and works will in loops, you have to use your mouse cursor and select from both ends of the label (hold down mouse button and drag over the audio track). The label markers will turn yellow when they are matched with your selection.
You can play this segment once from the beginning by press space or
by hitting the play button. But I often want to loop this section. You
can loop the section by using the hotkey shift + space or you can
hold down shift and click on the play button, which now turns into a
loop play button.
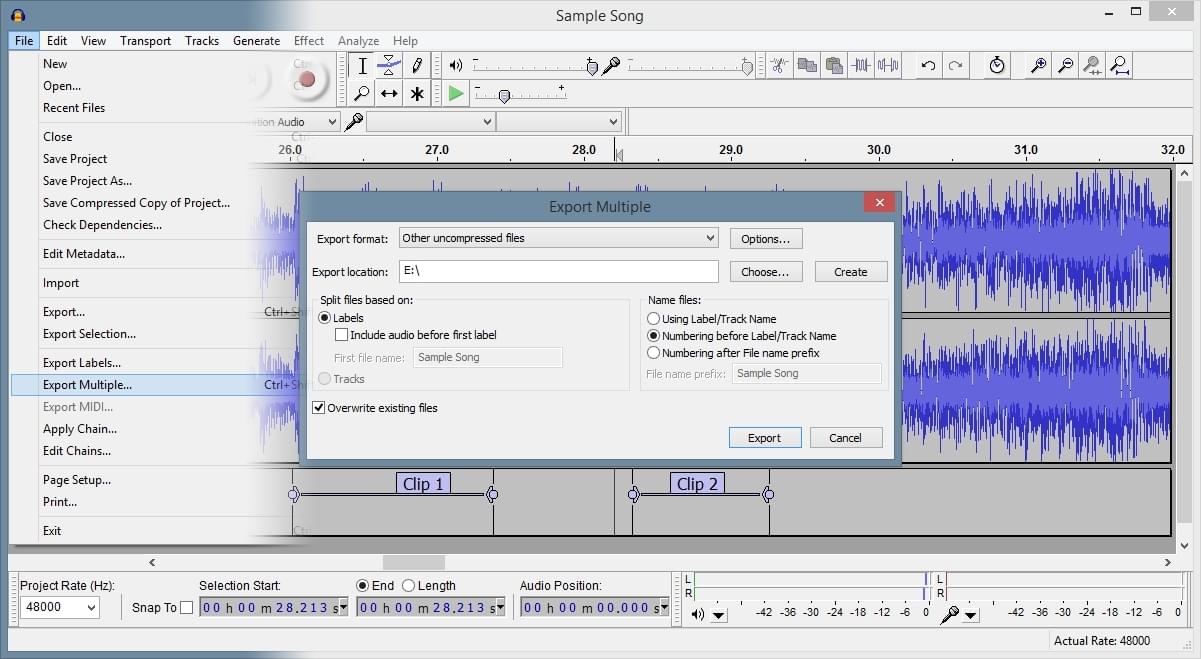
Exporting all Labels and Samples
These labels are useless unless we can get them onto our computer. In
the main navigation of Audacity, go to File - Export Multiple or you
can use the hotkey ctrl + shift + L.
A new window will appear with exporting details. You can select where all of the segments will be exported to, the exported format and the naming of the new files. I usually stick with using the Label Name you write when creating the labels to help me find specific tracks in the future.