USB Sniffing and Programming
This post is going to cover how to take a USB device and write software that can interact with the device without having publicly available documentation. I came about writing this post when I found an old AverMedia RECental USB button in a box of electronics. I wanted to repurpose the button and this is the result of that process. The device used while writing this tutorial was a very simple in that it only sent two different interrupts (pressed / released) along with a method to create LED animations. I only worked with interrupts and control transfers; I didn’t look into bulk transfers.
Sniffing USB Traffic
The first task is to figure out what the USB device is actually outputting along with what is being sent to the USB device. Before sniffing USB traffic, you should install all drivers and software that the manufacturer of the USB device suggests even if it’s optional. These additional programs will help you see the full picture of how the device functions and what data is sent to the USB device. Without the additional software you may not be able to fully see how the device functions. In my case, the software sent data to the USB device to manage and animate the LEDs on the device.
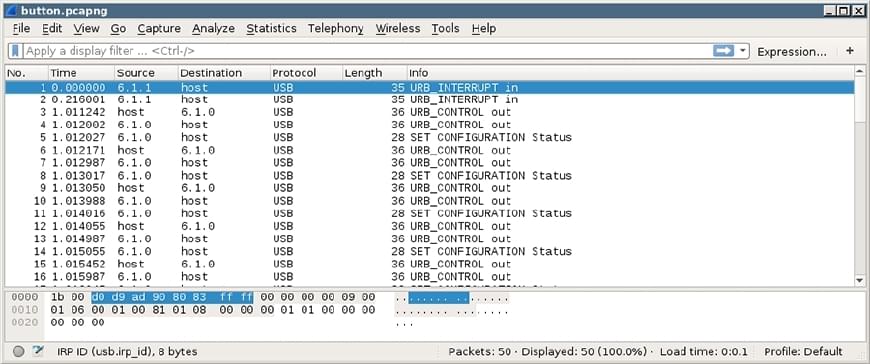
It’s fairly simple to sniff USB traffic using Wireshark with USBmon or USBPcap on Linux or Windows. During the Wireshark installation you will be asked if you want to install USB monitoring / capturing. Additional details can be found on the Wireshark website about USB Capturing. After starting Wireshark, you want to start capturing packets for the specific device.
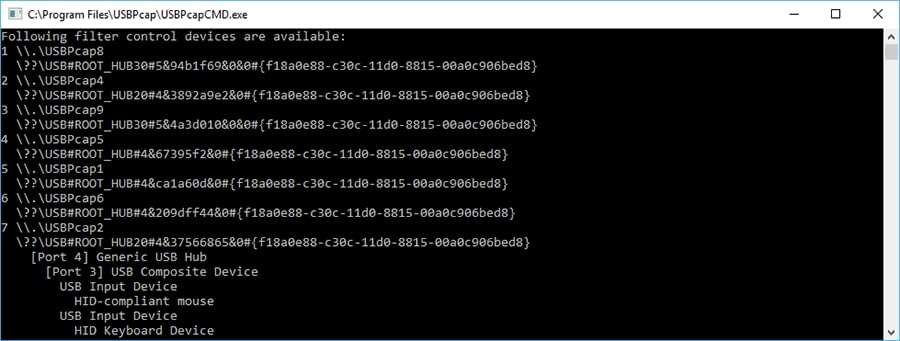
If you see multiple USB capture devices, you need to determine which hub your USB device is on. For Linux and usbmon run the command lsusb and find the Bus number for the device. For Bus 003 you will capture data from usbmon3. As for using Windows and USBPcap, you can identify the USBPcap interface by running the command USBPcapCMD.exe (located in “C:\Program Files\USBPcap”) without any arguments. The previous command will display a new window with the USBPcap interface along with the USB Hub and devices that are attached to it (the first column is not the USBPcap number).
If you’re new to using Wireshark, there is an abundance of resources online to get you started, but the application is fairly straight forward for basic use. For a quick overview, you can read the post Wireshark Interface Overview.
At this point, you simply want to start capturing USB traffic through Wireshark. Depending on the device, the best method of capturing data will vary. Generally you want to try to limit capturing to one specific event to make it easier to decode. Taking a joystick as an example, you would press a single button multiple times, add a packet comment, and then press a different button multiple times, write a comment and repeat. The reason for producing the same event multiple times is to ensure the data is the same for the same event and no sequential or timing information is passed.
Overview of the USB Specification
The USB specification for transferring information between the USB device and computer isn’t too complex if you’re just trying to figure out how a USB device works and to hack together a program. The specification has four different types of transfers (Control, Interrupt, Isochronous, and Bulk). Along with the transfer types, there are a few different types of descriptors that identify the device and the available communication methods. There are two websites I highly recommend for additional USB information, Beyond Logic and Jungo.
Control Transfers
Control transfers are generally used to get the USB device into a state that it can be functional. The majority of configuration happens through Control Transfers but other information can also be passed through this transfer. Control Transfers can travel in both directions and successful requests will always have at least two packets of data. Control transfers will have at least three packets for requests that send a payload.
Interrupt Transfers
Interrupt transfers are packets sent without a known interval or timing (unlike Isochronous). The USB device will queue interrupt requests until the host requests the information from the device. Interrupt transfers are used when a mouse moves, a button is pressed, etc.
Isochronous Transfers
Isochronous transfers are time dependent transfers and only work on full-speed and high-speed devices. Since keeping sync with time is more important, isochronous transfers will not try to reattempt failed transfers. Isochronous transfers are seen when using a USB audio interface, USB phone, etc.
Bulk Transfers
Bulk transfers are for large payloads that are not time sensitive. Bulk transfers are seen when sending or receiving data to a printer or a scanner. These transfers have error correction and detection ensuring that the transfer is transmitted without error.
Descriptors and Endpoints
USB devices have many different descriptors that identify the USB device itself and the available communication methods and endpoints. There are four descriptors to focus on, Configuration, Interface, Alternative Settings, and Endpoints. There can be multiple configuration descriptors, but there has to be at least one and the majority of USB devices only have one. The configuration descriptor allows devices to vary based on the environment they are in (such as how they are powered). The configuration descriptor then identifies the interfaces that are available. The interface descriptor groups together endpoints that are to be used. Interfaces can have alternative settings that affects what endpoints will actually be used. Endpoints define the communication method between the host and the device, the direction of communication, max packet size, and additional transfer information.
Programming with LibUSB
LibUSB is a cross platform USB library. To get started, you want to download libusb apt install libusb-1.0-0-dev which is different than libusb-dev. Below are some snippets of code that will hopefully help you get started with programming an application that interacts with your USB device.
The first program is the basic setup of the libusb library. The code has two #define statements that identify the USB vendor and product ID we are searching for along with a function that will find the device. This could easily be modified to by dynamic values or determined by iterating through all devices. You can find the vendor and product ID by running lsusb on Linux or inside of the device manager in Windows. The IDs are generally displayed in hexadecimal format. Here’s a list of all USB vendor ids.
#include <stdio.h>
#include <stdlib.h>
#include <libusb-1.0/libusb.h>

#define VENDOR 0x0000
#define PRODUCT 0x0000

int find_device(int vendor, int product, libusb_device **output, libusb_device_handle **handle) {
	libusb_device **list;
	libusb_device *device = NULL;
	struct libusb_device_descriptor desc;

	int status = 0, res = 0;
	ssize_t i = 0;
	ssize_t cnt = libusb_get_device_list(NULL, &list);

	*output = NULL;
	*handle = NULL;

	if(cnt < 0) {
		fprintf(stderr, "No USB devices discovered.\n");
		status = 1;
		goto cleanup;
	}

	for(i = 0; i < cnt; ++i) {
		device = list[i];
		res = libusb_get_device_descriptor(device, &desc);

		if(res != 0) {
			fprintf(stderr, "[%d] Error getting device descriptor.\n", res);
			continue;
		}

		if(desc.idVendor == vendor && desc.idProduct == product) {
			*output = device;
			break;
		}
	}

	if(*output != NULL) {
		res = libusb_open(device, handle);
		if(res == LIBUSB_SUCCESS) {
			status = 0;
		}else{
			status = 2;
			fprintf(stderr, "[%d] Failed opening USB device.\n", res);
		}
	}else{
		status = 3;
	}

	cleanup:
	libusb_free_device_list(list, 1);
	return status;
}


int main(int argc, char *argv[]) {
	libusb_device *device = NULL;
	libusb_device_handle *handle = NULL;
	int status = 0;

	libusb_init(NULL);

	status = find_device(VENDOR, PRODUCT, &device, &handle);
	if(status != 0) {
		fprintf(stderr, "[%d] Failed to find device.\n", status);
		goto cleanup;
	}

	//
	// Add USB Logic Here
	//

	libusb_close(handle);

	cleanup:
	libusb_exit(NULL);
	return status;
}
This function iterates through all the descriptors to find interrupt endpoints to use. Wireshark should display the endpoint (an integer) in the packets you previously captured, but for endpoints that haven’t been used or to programmatically find endpoints, use the function below.
void get_endpoints(libusb_device *device, uint8_t *endpoint_in, uint8_t *endpoint_out) {
	int i = 0, j = 0, k = 0;

	struct libusb_device_descriptor desc = NULL;
	struct libusb_config_descriptor *config = NULL;
	const struct libusb_endpoint_descriptor *endpoint = NULL;

	libusb_get_device_descriptor(device, &desc);
	libusb_get_config_descriptor(device, 0, &config);

	for(i = 0; i < config->bNumInterfaces; ++i) {
		for(j = 0; j < config->interface[i].num_altsetting; ++j) {
			for(k = 0; k < config->interface[i].altsetting[j].bNumEndpoints; ++k) {
				endpoint = &config->interface[i].altsetting[j].endpoint[k];

				if ((endpoint->bmAttributes & LIBUSB_TRANSFER_TYPE_MASK) & LIBUSB_TRANSFER_TYPE_INTERRUPT) {
					if (endpoint->bEndpointAddress & LIBUSB_ENDPOINT_IN) {
						*endpoint_in = endpoint->bEndpointAddress;
					} else {
						*endpoint_out = endpoint->bEndpointAddress;
					}
				}
			}
		}
	}

	libusb_free_config_descriptor(config);
	return;
}
Before you can use a device you must claim the interfaces you plan on using. Below are two functions to claim and release all interfaces for a device handle. The functions will return 0 on success or will return a LIBUSB_ERROR value. Before claiming or releasing interfaces, you might have to detach the kernel driver if you’re using Linux.
int claim_interfaces(libusb_device *device, libusb_device_handle *handle) {
	int i = 0, res = 0;
	struct libusb_config_descriptor *config = NULL;

	res = libusb_get_config_descriptor(device, 0, &config);
	if(res != 0) {
		goto cleanup;
	}

	for(i = 0; i < config->bNumInterfaces; ++i) {
		res = libusb_claim_interface(handle, i);
		if(res != LIBUSB_SUCCESS) {
			for(i; i >= 0; --i) {
				libusb_release_interface(handle, i);
			}

			fprintf(err, "[%d] Failed claiming interface.", res);
			break;
		}
	}

	cleanup:
	libusb_free_config_descriptor(config);
	return res;
}

int release_interfaces(libusb_device *device, libusb_device_handle *handle) {
	int i = 0, res = 0;
	struct libusb_config_descriptor *config = NULL;

	res = libusb_get_config_descriptor(device, 0, &config);
	if(res != 0) {
		goto cleanup;
	}

	for(i = 0; i < config->bNumInterfaces; ++i) {
		libusb_release_interface(handle, i);
	}

	cleanup:
	libusb_free_config_descriptor(config);
	return res;
}
Additional Information
If you followed the tutorial above with Linux, you may notice that you need root access to run your program. This is because you don’t have a udev with proper permissions created. I haven’t looked enough into udev to write a section about it yet, but the information on Oracle should get you started.
When compiling your program that uses libusb add the argument -lusb-1.0 to gcc. The libusb-1.0-0-dev is different than the libusb package available. The header you want to use is libusb-1.0/libusb.h.
